Because of the open-source nature of Umbraco, more than one kind of Umbraco page block builder exists out there in the world. Today we will be taking a look at Perplex's Content Blocks, and how it compares to the Umbraco Block List Editor!
Perplex Content Blocks
Content Blocks is an open-source package developed by Perplex, that makes use of Umbraco's NestedContent, but provides a more advanced user interface and new features ontop of this. Some of these features are, but not limited to:
- Disabling/Hiding a block, not rendering it on the front-end.
- Advanced preview window from within the back-office.
- Defining multiple layouts per block.
- Larger block picker & categories for each type of block.
- Advanced integration with uMarketingSuite (but more on that later!)
These features provide the back-office user with an improved editing experience compared to the NestedContent Editor that ships with Umbraco ever since it was introduced in Umbraco version 7.7.
After installing the ContentBlocks NuGet Package (in this case we'll be using version 2.1.1 for Umbraco version 9.3), we will have a new editor available to add and use on our Doctypes, called the Perplex.ContentBlocks editor, available under the lists section. We have a couple of editor settings available on here, including the option to configure which category of Blocks should be allowed to be shown and selected (Header + Blocks being the default), whether or not we want to disable the built-in preview mode for our editor, whether we want to hide the container that the ContentBlocks editor is in, and whether we want to allow the addition of blocks without having to add a header first.
What we end up with is a clean looking interface on the page(s) of our choosing, allowing us to add new Blocks on one side, and the Smart Preview function on the other!
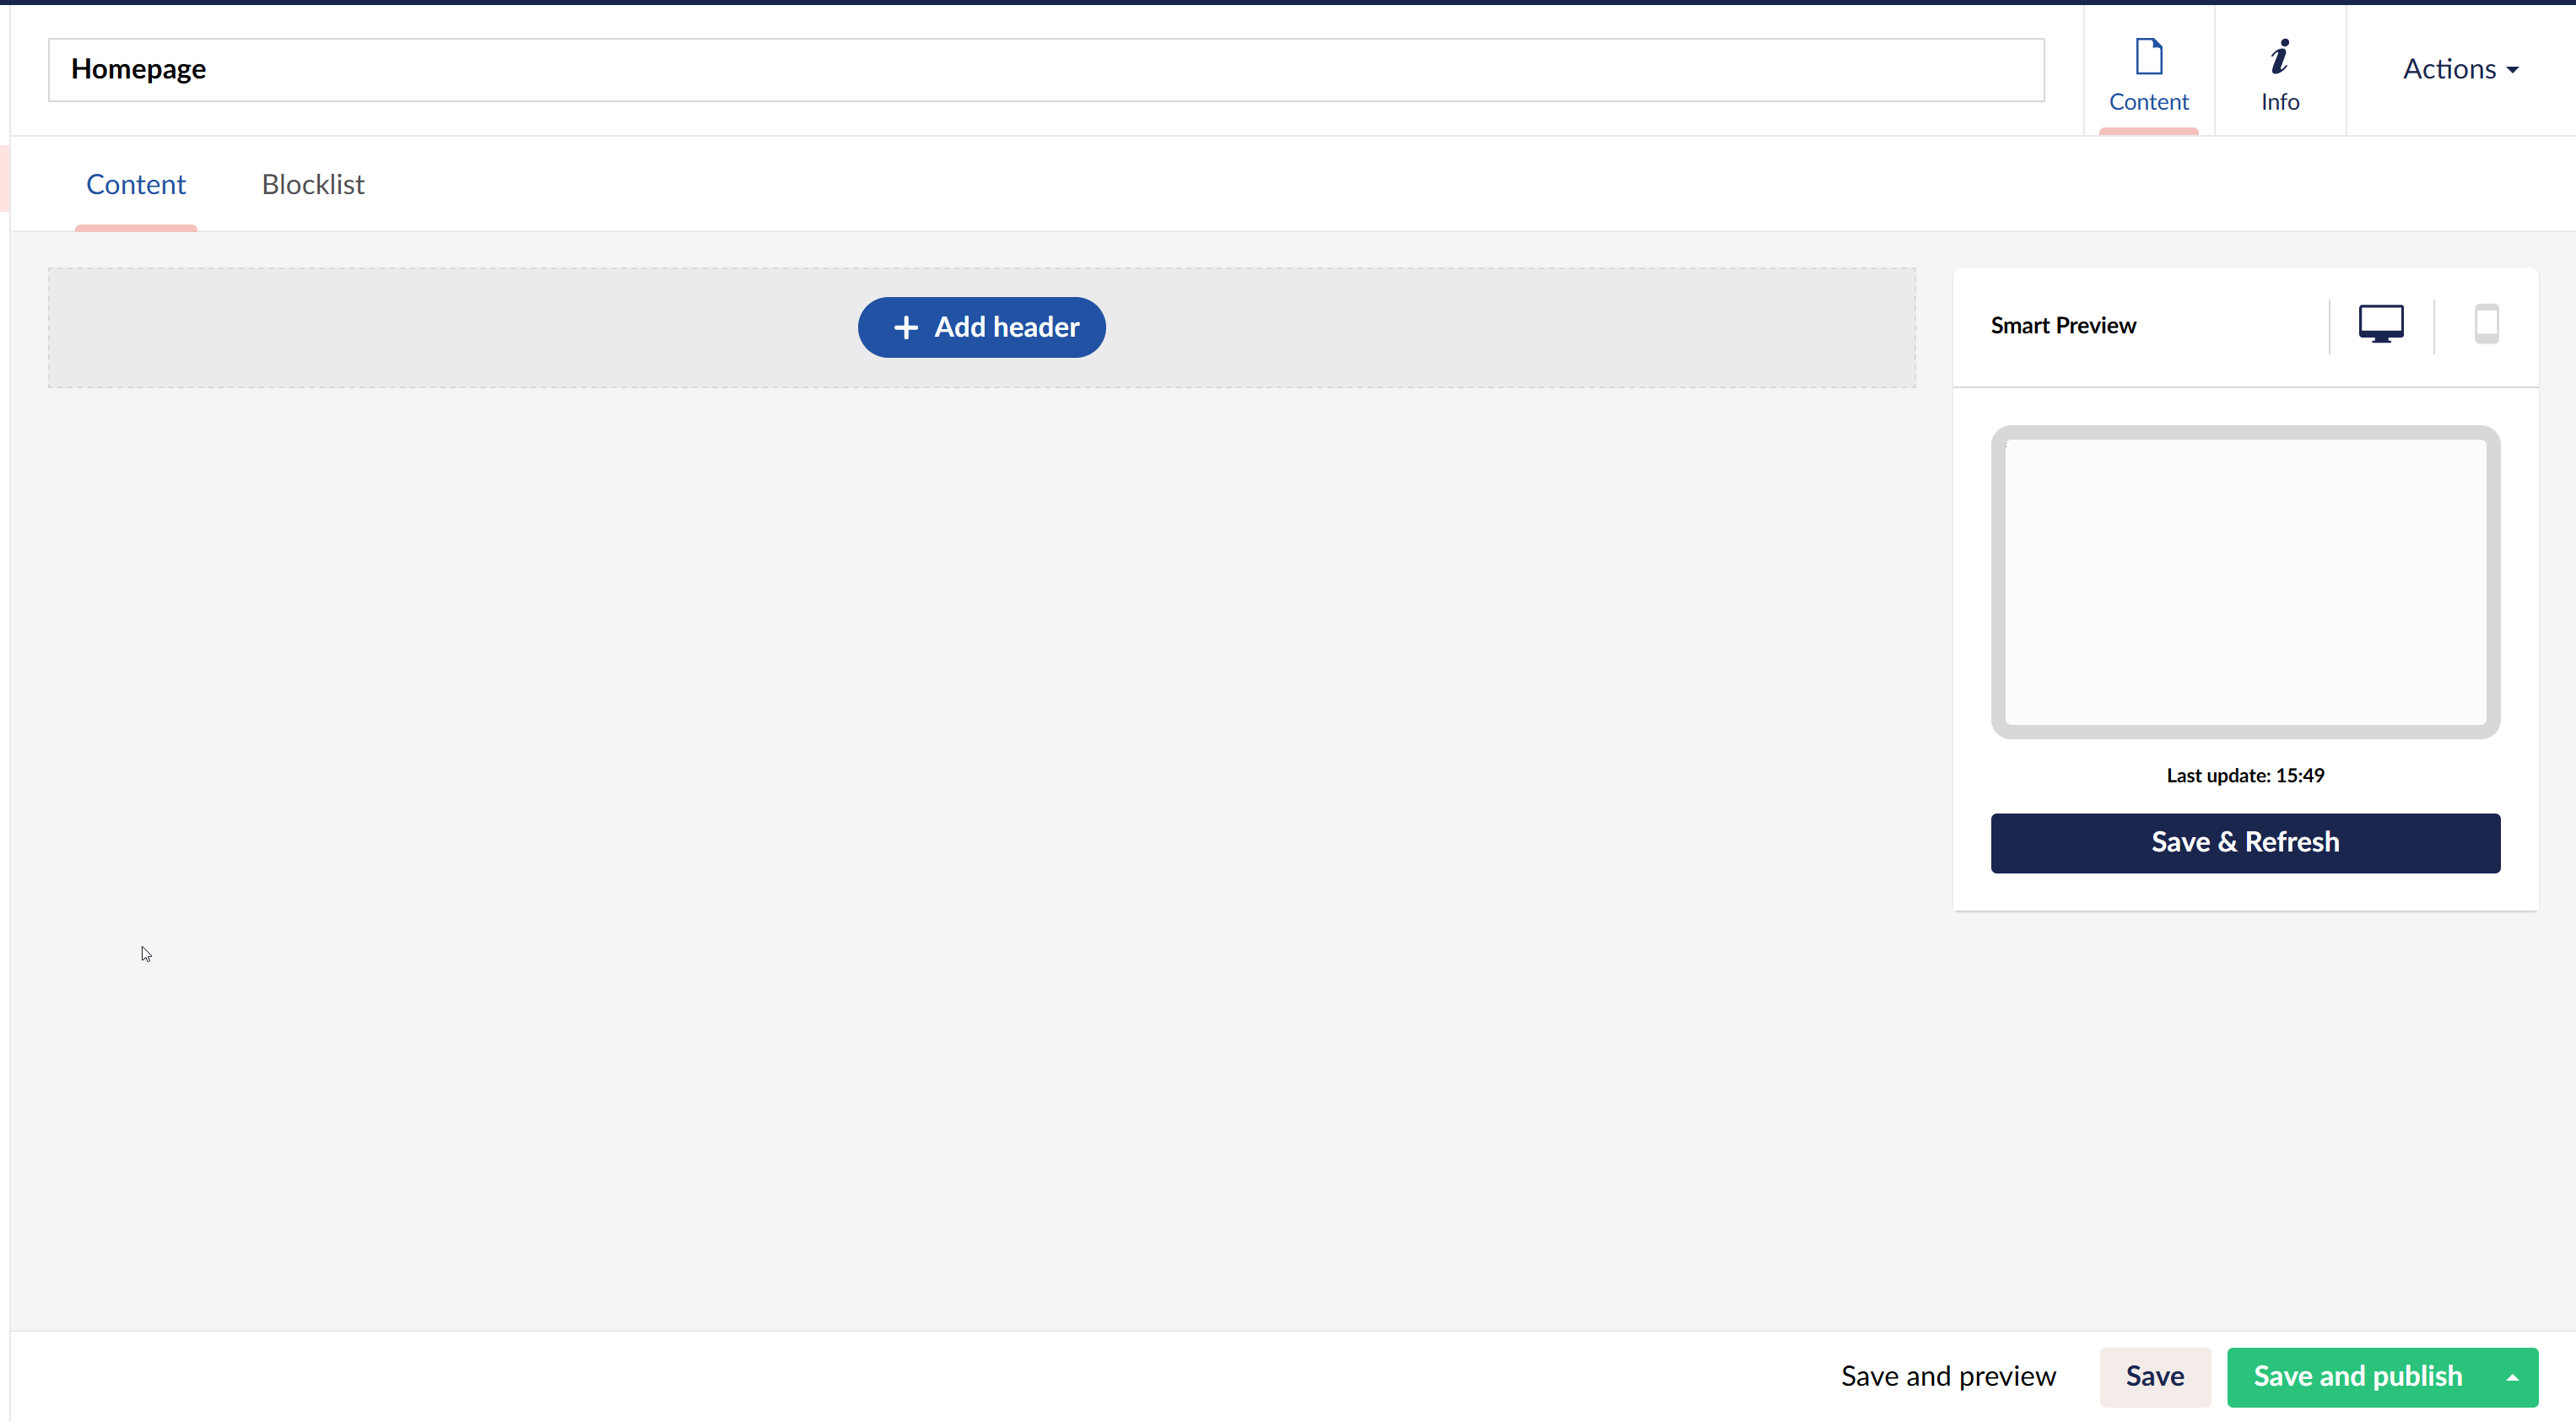
Attachment 1. The ContentBlocks Editor on our doctype
Creating a Content Block
To get started by creating a Content Block, we first have to create an Element Doctype containing the properties we wish our Content Block to contain. Make sure you tick the "is an element type" in the Permissions section of our item.
Second, we have to create a new data type, based on the Nested Content property editor, in which we specify the previously created element to be allowed, and set the min. items & max. items to 1.
Now we get to coding...
Creating a Content Block is very code-heavy. Once we have created our data type, we have to register a new Content Block Definition in our code, that references that Data Type. This is also the location where we configure:
- Its Id, Name, Description & Preview Image
- Which Document Types this Content Block should be available on
- Which Cultures this Content Block should be available in
- Which Layouts it should have
Each layout is also defined within our Content Block definition, in which we once again configure its ID, Name, Description & Preview Image, but most note-worthy, the path to the View which this layout should use.
Now that we have defined our code-behind/definition of our Content Block, we have to make sure we register our Content Block. We do this by Injecting an instance of IContentBlockRepository into our code (like in a Component/Composer), and add our definition to it.
More info on how to get started with Content Blocks can be found here.
Now that we have defined and registered one or more Content Blocks, we are now able to add the blocks to our pages! In the screenshot below you can see an example (credits to Daniël Knippers) on what it looks like in the back-office when picking an item to be added to the page:
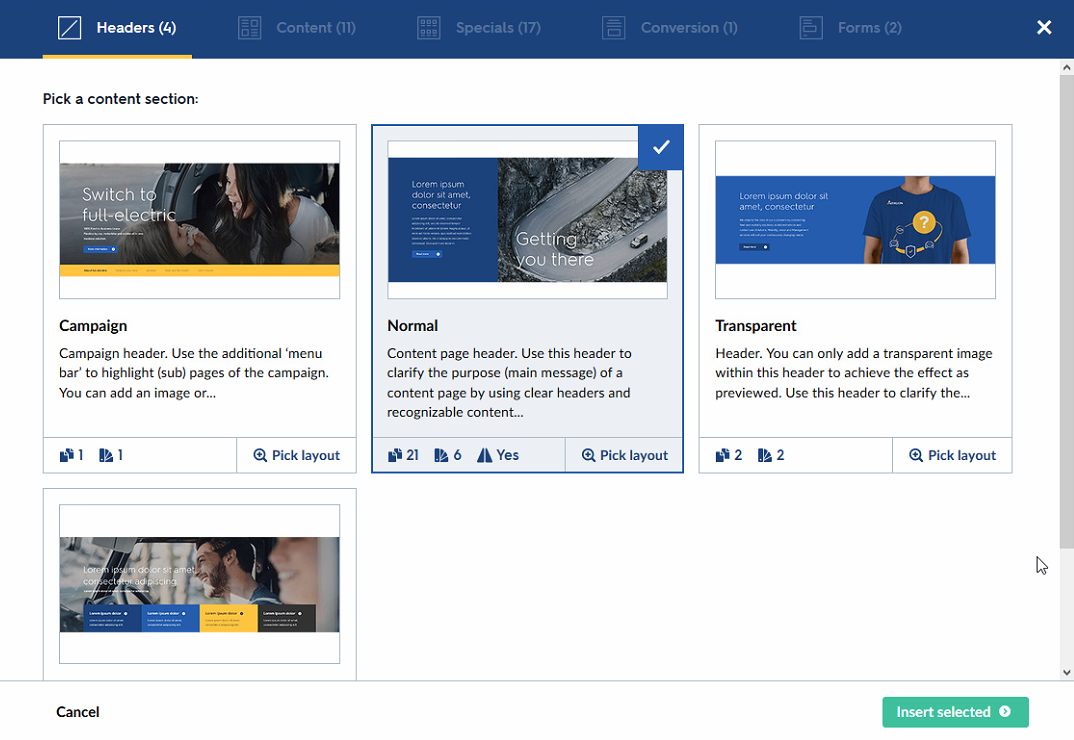
Attachment 2. Pick a content section, by Perplex
Now all that's left for us to do, is render out Content Block(s)! For this, we can inject an instance of IContentBlockRenderer into our Razor view, and call the Render method on said renderer with the Model.ContentBlocks parameter supplied. We now have our Content Block rendered on our view!
If you're not interested in rendering the Content Block using Razor, but perhaps any other form of rendering (or even a headless setup), that's also a possibility, as we can do whatever we like with the data, like making it available through an API endpoint!
The power of uMarketingSuite
In my opinion there is one place in particular where Content Blocks becomes a lot more powerful, and that's when you combine it with uMarketingSuite. For those who haven't heard of uMarketingSuite before, it's (as the name would suggest) a marketing suite for Umbraco, with things like analyics, A/B testing, and Personalization.
When combining ContentBlocks with uMarketingSuite (and the additional NuGet package to combine the two) you end up with the option to not only personalize your entire page, but also personalize and segment your Content Blocks on an individual Block level!
Whenever we add or edit a Content Block, we will now see the option to add a personalized variant of this specific Content Block. This allows us to specify a specific uMarketingSuite segment that we wish to show this specific variant of the Content Block to! Because of this, we can make use of all the other personalization options within uMarketingSuite to get our visitor to fit within a specific segment, like Personas, Customer Journeys and Events.
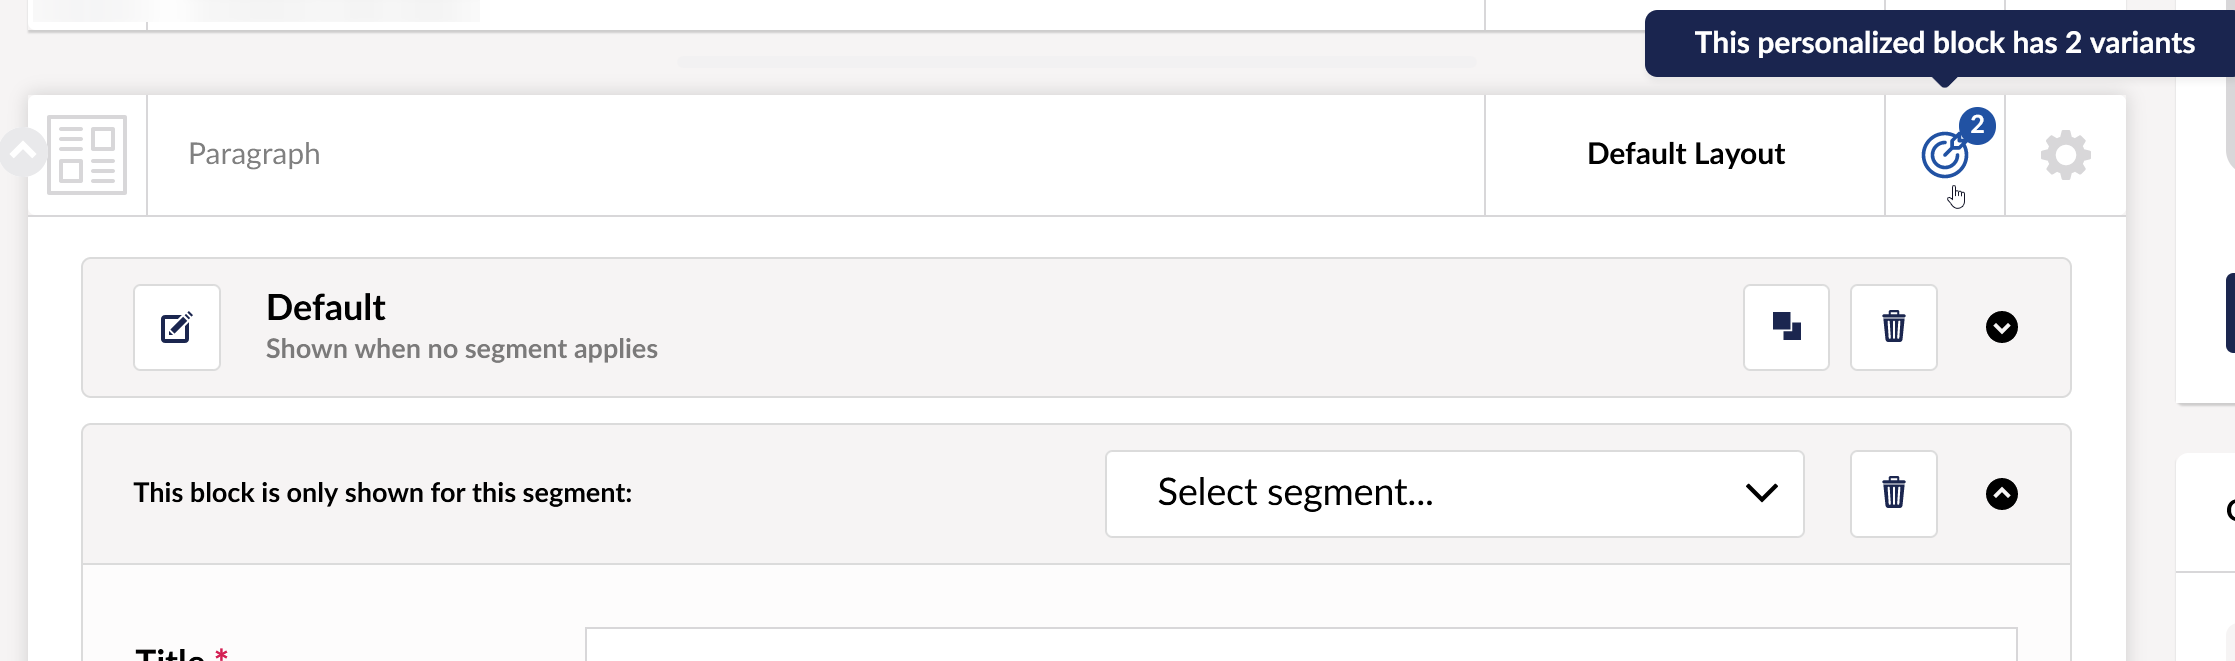
Attachment 3. Personalized block with 2 or more variants.
Umbraco Block List Editor
As of version 8.7.0, Umbraco ships with a new type of list editor called the Block List Editor. Compared to the 'old' standard of using Nested Content, which was a more data-input oriented editing experience, the new Block List editor is a lot more visually attractive. Not just that, but it also offers a wide variety of options and configurations to give us more control over both what the back-office user sees and how it uses the components, but also how the underlying Data Models are configured!
As Niels Lyngsø has written in an article back in September 2020, and I paraphrase; The Block List Editor was build to extend the concept of handling and storing data in a standardized way, with proper validation for Element Types, and providing the foundation for future property editors. As a developer you have a lot of control over how the blocks are displayed, edited and validated.
Before we can get started with the Block List Editor, we... don't really have to do much! No need to install any external packages, as it ships with Umbraco as of version 8.7.0! We can skip that part, and get straight into how we use the Block List Editor! This is also the first major benefit of using the Block List Editor, and that is that it ships with Umbraco, and support for it is guaranteed as an Umbraco core component.
Creating a Block List Element
To get started by creating a Block List Element, just like with the Content Blocks, we start off by creating an Element Doctype containing the properties we wish our Block List Element to contain. In our case we'll be making a simple Paragraph. Make sure you tick the "is an element type" in the Permissions (again!).
Second, we head over the the Doctype we wish to have a Block List editor, create a new property, and select a new configuration of the "Block List" as the editor. From here, we can configure our new Block List Editor with properties like the amount of Blocks we allow in this editor, whether we want to enable Live editing mode, inline editing mode, and where we define which Blocks we can use!
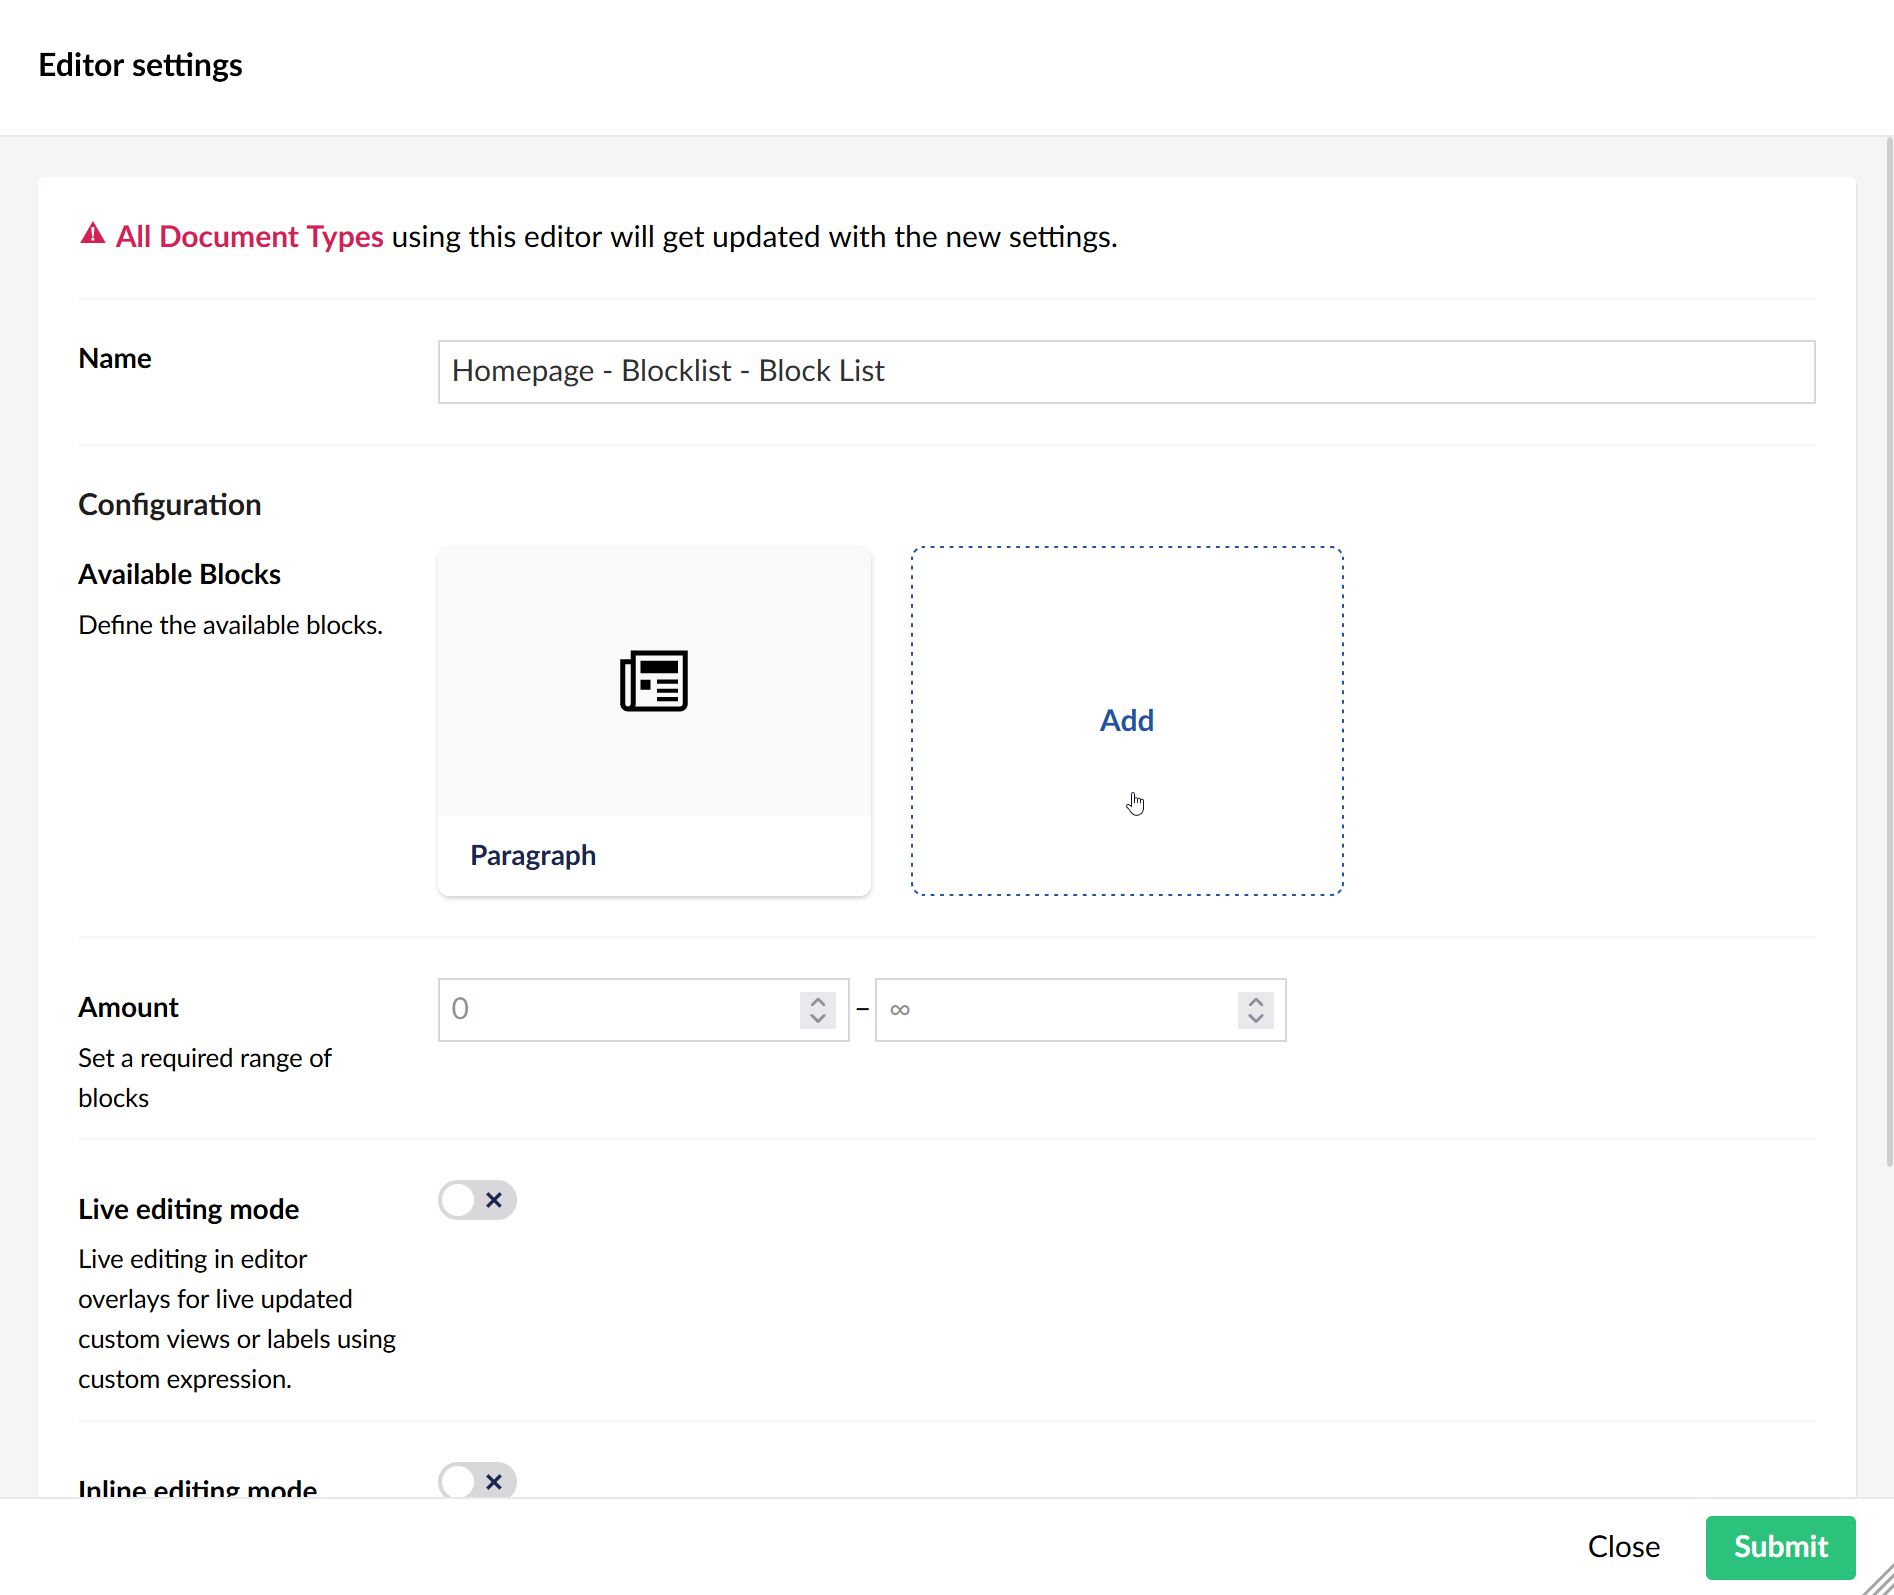
Attachment 4. Configuring the Block List Editor
When we add a new Block, and selecting the matching Element type to go along with it, we will be greeted with a wide variety of configuration options for this Block. These configurations are split into four different sections:
- The editor appearance
- Data models
- Catalogue appearance
- Advanced
The Editor appearance section allows us to configure how the block appears when presented in the content section for our back-office user. Here we can configure fields like the label (which can be static or dynamic!), add a custom view to be represented to the back-office user, and even add a scoped CSS file for this.
The Data models section allows us to configure which content model & settings model is used for our Block. The content model corresponds to the Element type that we have selected, and if we wish to do so we can also configure an additional settings model. This settings model allows us to create a new (or existing) element type on-top of the properties we configure in our content model, used for storing additional properties.
The Catalogue appearance section allows us to configure what we see when we choose a block to add to the Content section. Here we can set the Background color, Icon color, and even set a custom thumbnail of for example an SVG, or perhaps a visual preview of what our block looks like!
And lastly, the Advanced section gives us the option to forcibly hide the entire content editor of our element.
Once we have configured our new Block List Element, and have it set as one of the Available Blocks on our Block List Editor, we can now start adding it to our page! From our page, we have the option to either create a new Content Item, or copy and paste one from our clipboard of we wish to do so!
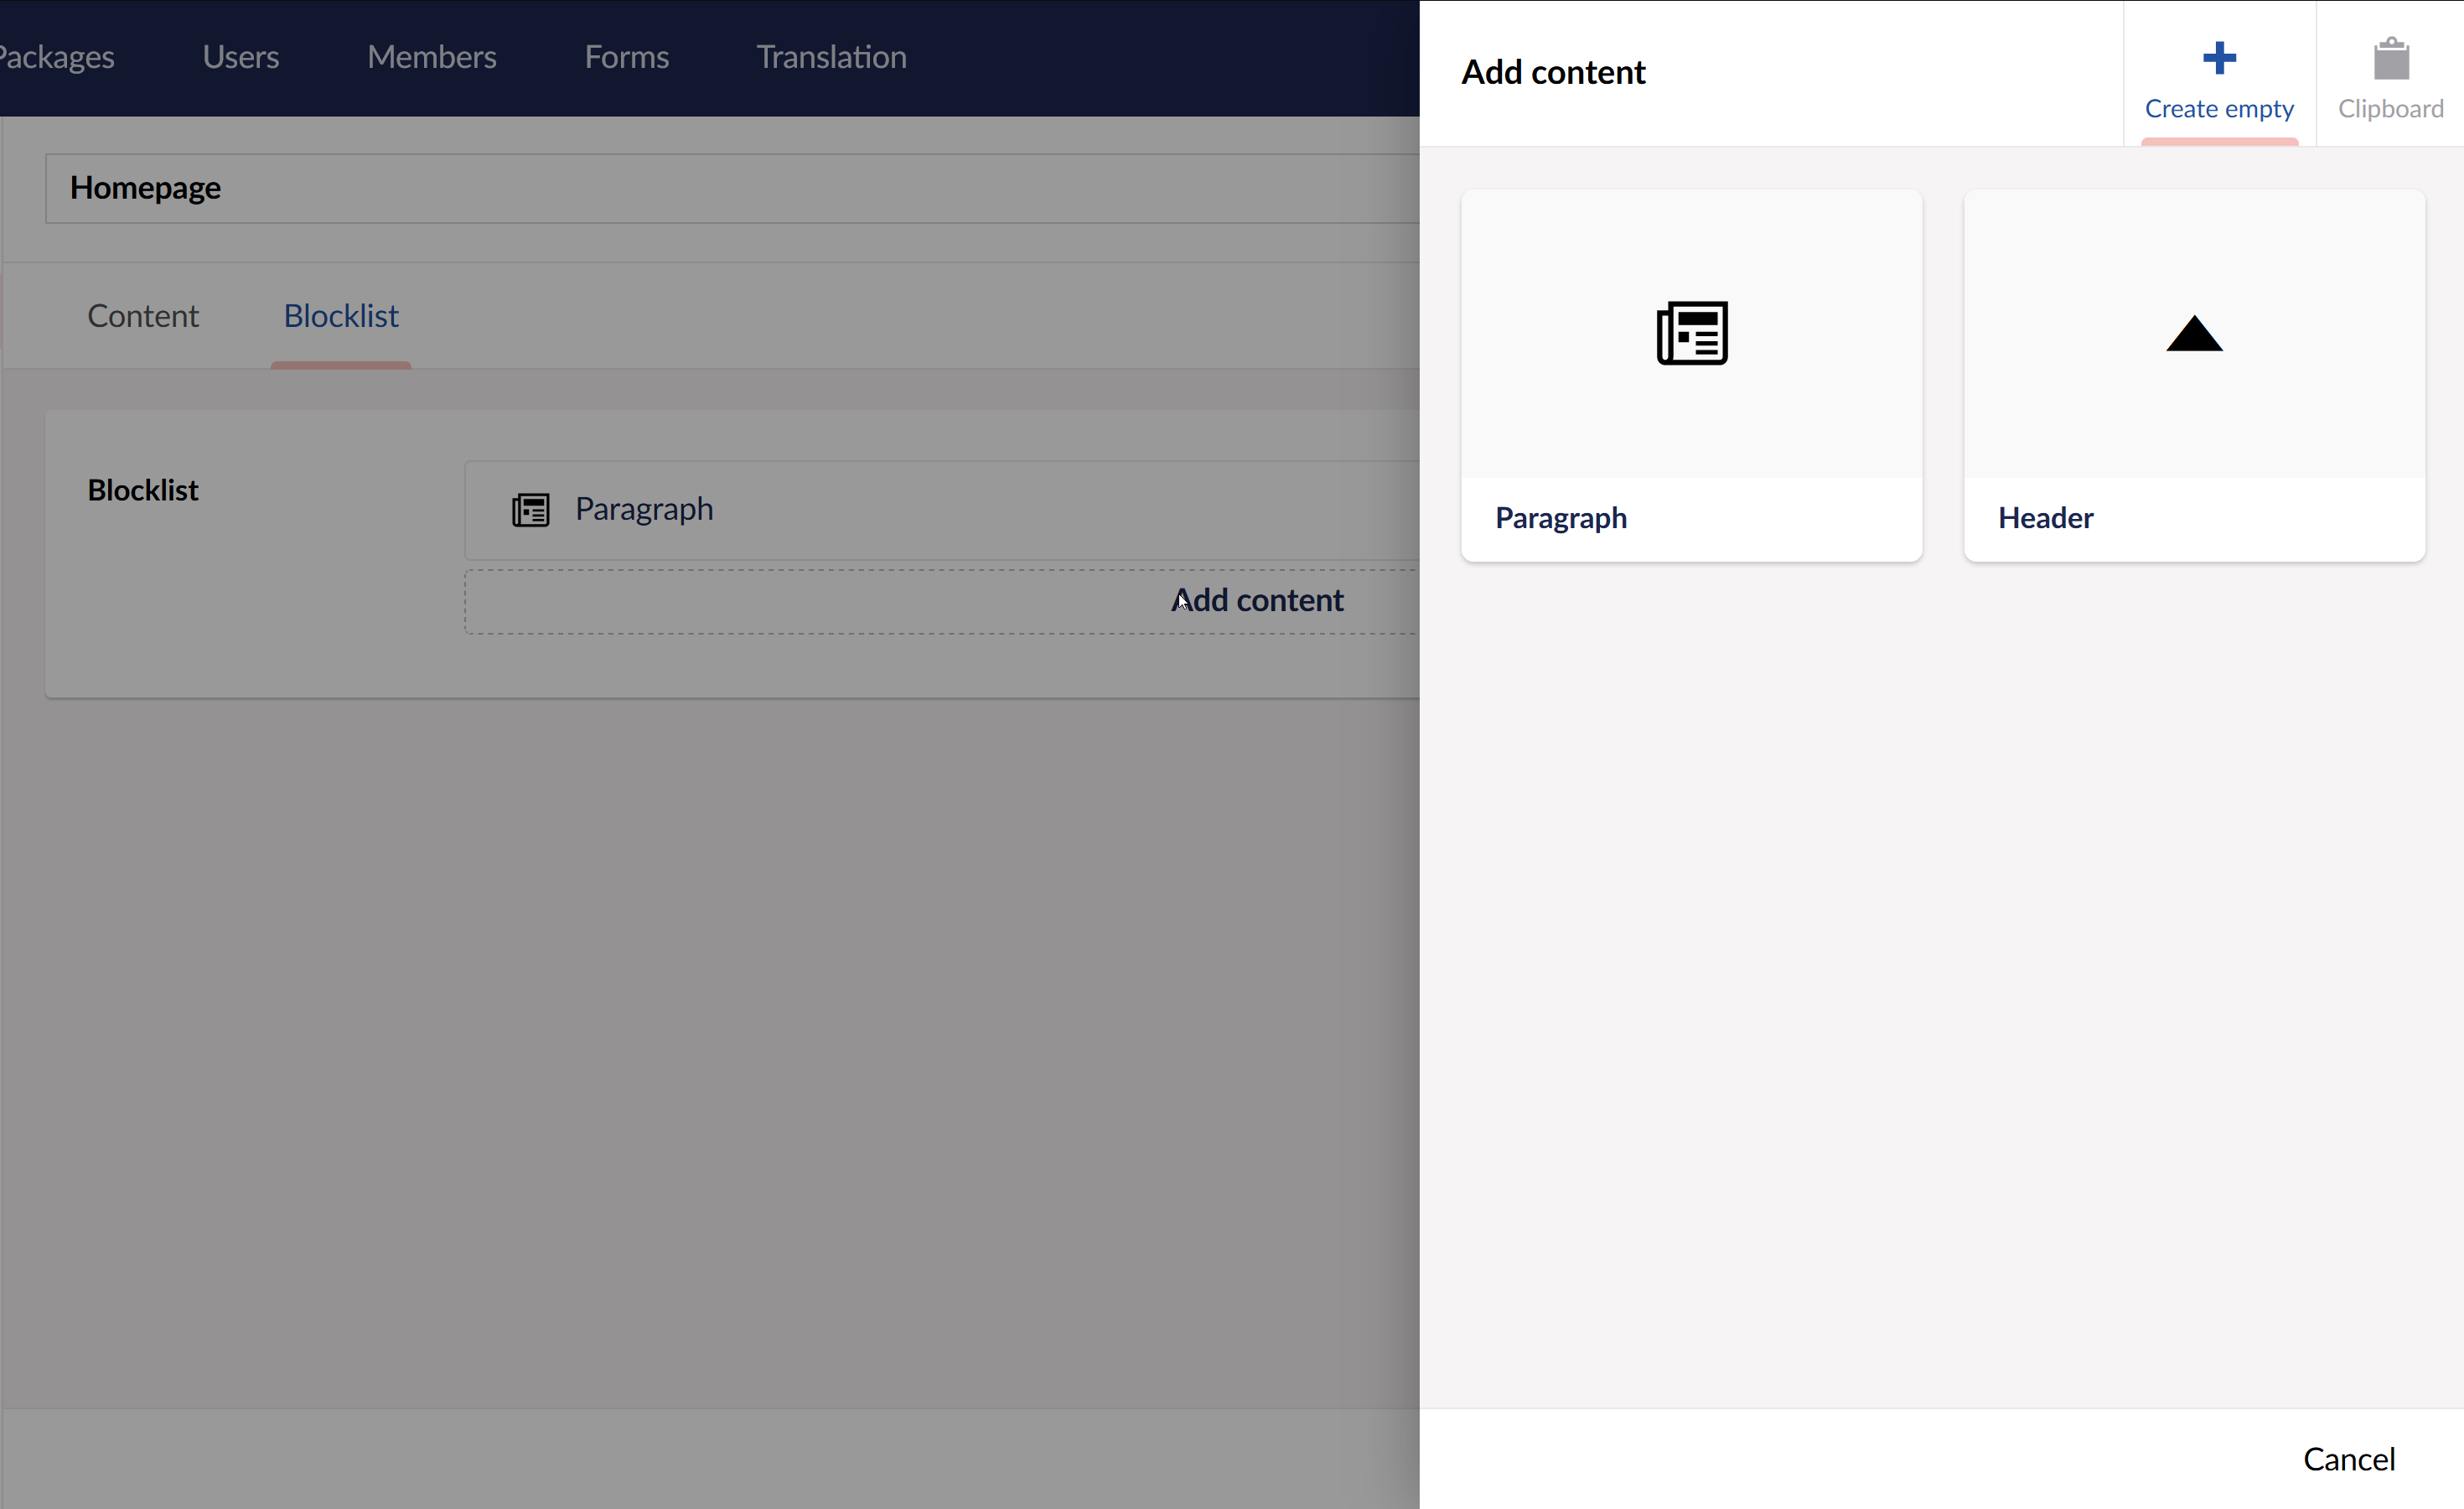
Attachment 5. Pick a Block List item
Now that we have our Block List Item(s) configured, we can start rendering our Items! We start of by creating a new view for our item. By default the folder structure that gets used is 'Views/Partials/blocklist/components/ItemContentTypeAlias', but if we wish to change this, we can do so by editing the default.cshtml that's in the blocklist folder, that's responsible for rendering the individual Partials.
We use the generic class BlockListItem to inject/inherit from in our view, which gets passed to our partial as the model. From here, we can access both the Content item, and the Settings item if we configured our item to make use of one. We have to manually cast the Content item to our specific ModelsBuilderModel if we want to make use of that, as this isn't automatically picked up by the model. Sadly we don't have any control of the workflow that happens under the hood for our model, so we aren't able to hook into the controller, or make use of a custom View Model from an MVC point of view. And that's it for our component!
Now that we have our component's view ready, we can make use of the HtmlHelper provider by umbraco to automatically render all our Block List Item Partials by calling the "@Html.GetBlockListHtml(Model.Blocklist)" method in our page's razor view, where in this case I am using the ModelsBuilder model variant to directly specify the Blocklist property on our Doctype. If you're not using the ModelsBuilder variant, you can also pass in your entire Model, and as an additional parameter pass in the alias for our editor property as a string!
Of course if we wish to turn Umbraco into a Headless CMS, we can also do that by accessing the BlockListItem data from within, lets say, an API endpoint instead too! You're not forced to render it if you don't want to!
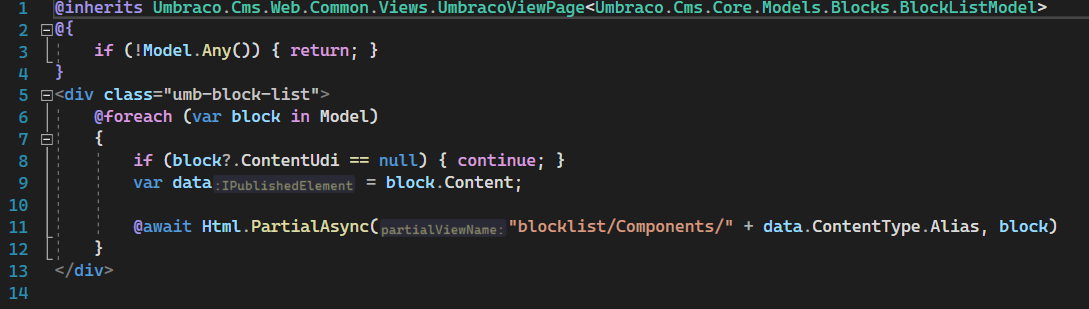
Attachment 6. The default rendering method for Block Lists
Which List Editor should I use?
Like most questions in life, the answer would be 'it depends', so lets sum up my personal pro's and con's of both options so that you can determine which version works best for you yourself!
Perplex Content Blocks
+ Much more visually appealing than Nested Content.
+ Multiple layout options for the same Block.
+ Gorgeous back-office UI (personal preference).
+ Advanced integrations with uMarketingSuite.
- Requires a lot of back-office configuration.
- Requires even more code configuration.
- Not officially supported by Umbraco.
Umbraco Block List Editor
+ Umbraco's successor to Nested Content.
+ Is shipped with Umbraco 8.7.0+.
+ Officially supported by Umbraco.
+ Supported in Umbraco Heartcore.
+ Requires little to no code configuration.
- Single layout for each Block (unless you work around that with block settings).
- Less control over the workflow of the BlockListItems.
- No (out of the box) support for custom View Models.
Conclusion
The Umbraco Block List Editor is an officially supported, out of the box option for a friendly back-office user experience, requiring little to no code to function.
If you prefer the UI and UX that you get with Perplex Content Blocks instead, and are willing to put in the extra time & code to make the Content Blocks work exactly the way you want them to within your own workflow, than that might be the better option for you!
Do you want the reassurance that you're working with an officially supported Umbraco editor, or do you want to benefit from from a tool like uMarketingSuite in your editing experience? These trade-offs are worth keeping in mind! 🔥
If you have any further questions, feel free to contact me over at my socials available at the Contact page, and I'd love to hear about the amazing creations you're able to come up with! 😄
Sources used in this article:
Umbraco Documentation, https://our.umbraco.com/Documentation/Fundamentals/Backoffice/property-editors/built-in-property-editors/Nested-Content/
Umbraco Documentation, https://our.umbraco.com/Documentation/Fundamentals/Backoffice/property-editors/built-in-property-editors/Block-List-Editor/
Content Blocks Package, https://our.umbraco.com/packages/backoffice-extensions/perplexcontentblocks/
Content Blocks Github, https://github.com/PerplexDigital/Perplex.ContentBlocks
uMarketingSuite.ContentBlocks Package, https://www.nuget.org/packages/uMarketingSuite.ContentBlocks/
Deep Dive: The Block List editor, by Niels Lyngsø, https://umbraco.com/blog/deep-dive-the-block-list-editor/