With Umbraco 8 having officially reached End-of-Life last month, it was about time I upgraded this site and to enjoy all the latest features Umbraco has to offer. What did I do to upgrade this entire site within less than a couple of days? Let's talk about that! 🚀
Getting Started
The first thing I had to decide on was which version of Umbraco I wanted to upgrade to, having the options betIen the Long Term Supported V13, or the latest and greatest V15? Because I wanted to have this site run with as little maintenance as possible in the coming year(s), I decided to go for the LTS version for now as it will be maintained untill the end of 2026.
The Umbraco 8 version of cornehoskam.com had become quite troublesome to maintain, so the first thing I had to do was update it to the latest version of Umbraco 8 (8.18.14 in this case). Besides updating the CMS I also had to make sure to update to the latest version of Umbraco Deploy (4.10.0) for what's coming up next!
After that, I created a brand new Umbraco Cloud project running on the latest version of 13 to serve as a new foundation for the new site. With the upgrade not only being five new Umbraco versions, but also going from .NET Framework to .NET Core, I would need a blank slate to code on!
Where previously I might have needed various intermediary Umbraco versions to skip five major versions, I was able to skip directly from V8 to V13 during this upgrade!
Exporting from Umbraco 8
After the preparations were done, it was time to move over all the content from the old site to the new one. Here is where Umbraco Deploy saved the day! Because upgrading from V8 to V13 ment that Nested Content has been replaced by Blocklists, and Media Pickers have been upgraded to a new format, this would have been a painful endeavour without Umbraco Deploy, as I've learned through-out my days in the Digital Agency world!
I started off by creating a full export of our V8 site by right clicking on the content section, and then "Export".

Attachment 1. Exporting Content
After which you can specify all the various depedencies we which to export to a ZIP file, which in our case are all of them!
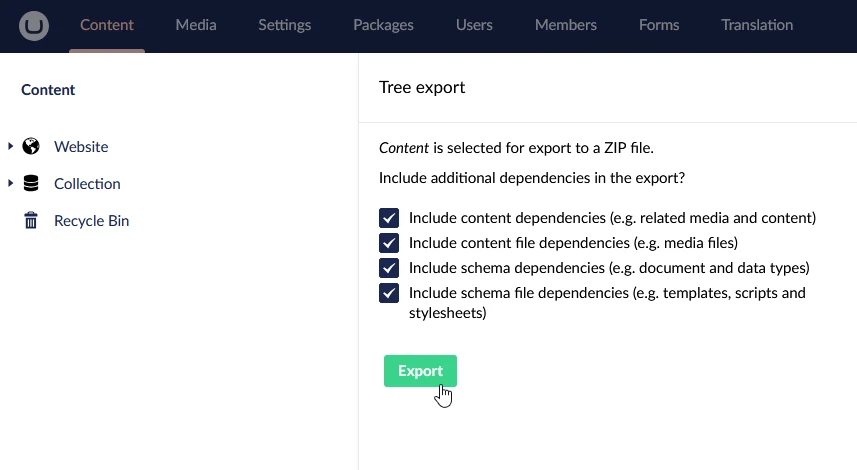
Attachment 2. Selecting additional dependencies for export
What you end up with is a zip file containing all of our content, related media, document & data types, templates, and more!
Importing into Umbraco 13
With the export available, I was able to import all of our sites contents back into our newly created V13 project. Before I did that however, I would first need to take care of the deprecated dependencies I have previously mentioned.
Umbraco Deploy ships with various so-called Artifact Migrators out-of-the-box that you can enable, that will automatically convert deprecated data types & property types to their respective new types when importing or deploying content! To register these migrators, you can add the following code snippet to our freshly cloned V13 solution, as provided by Umbraco docs:
There are various other kinds of Migrators available as well, not to mention the ability to create your own custom ones if you are dealing with custom property- or datatypes, that you can enable, but these were all the migrators that were needed for this particular site.
After all is set and done, I could run the V13 project and admire the (still empty!) Umbraco back-office! What I did next won't suprise anyone, which is to Import the zip file I previously created on the V8 project. By right clicking on the content section, and then clicking "Import", we can select the zip file, and let Umbraco process it all within a couple minutes! ⌛
After these steps, you will end up with a mirrored back-office of your V8 site on our V13 solution, but with all the latest and greatest data & property types thanks to the Artifact Migrators. Honestly, I was suprised by how easy this was compared to previous Umbraco upgrades!
Get to Coding!
The steps that I have done so far have prepared the back-office to contain all our newly setup content, media, and data types, but there was no code yet and therefor no visible website! Depending on the size of our website and the amount of custom code you had in your V8 instance, this can either take you a couple of hours or several weeks, as there is unfortunately no easy way to migrate code from .NET Framework to .NET Core.
For a site of this size it was all surprisingly straightforward. Even though there were hand full of things I had/wanted to take care off during the upgrade to make my life easier in the future, code wise I could reuse a lot of things I've learned over the years to achieve the following:
- Migrate all Partial Views to ViewComponents to allow for easy re-usability.
- Get rid of most Render Controllers and render ViewComponents instead.
- Restructure services to make use of the new way of dependency injection in .NET Core.
- Implement an RSS feed.
- Implement a Sitemap.
- Implement a new search & tagging system.
In addition to that, the performance and UX could use some attention as well by using by optimizing Image croppings & formatting using ImageSharp, updating various icons & images through-out the site, and redesigning the About Me page for a fresh look and feel!
Pushing & Launching
With the entire site looking rather spiffy and performing better than I've previously thought possible, it is time to push it from our local development environment over to production. Luckily this was a breeze for a site like this running on Umbraco Cloud. ☁️
Code wise, all I had to do was commit all the changes made and push them to the cloud, where they are automatically deployed to run on Umbraco Cloud. Content wise, using Deploy I was able to queue the entirety of my local environment in the same section as the Import & Export buttons, and push it over to Live! Tweak a couple of configurations here and there, update the DNS records, and within a couple of minutes, I had a live clone of my local environment running! 🙌
Summary
Where in the past major Umbraco upgrades were painstakingly difficult and required hours upon hours of preparations, using Umbraco Deploy & Cloud have made this upgrade a lot smoother. By exporting the entire site in Umbraco 8, importing it back into a blank Umbraco 13 instance and having Deploy take care of any Umbraco deprecation's, all that was left to do was rebuild the code-behind of cornehoskam.com and I was ready to go live! 🚀
If you've made it all the way to the bottom, I would like to thank you for your interest, and if there is anything I've mentioned that you'd like to learn more about feel free to contact me over at my socials available at the Contact page, of which I may expand on in a future blog! 😊